

What you need to know
Call Centers temporarily hold calls in the cloud when all users assigned to receive calls from the queue are unavailable. Call Centers provide an automated “answer” with customizable greetings, comfort messages, and hold music for the caller to listen to.
Queued calls are routed to an available agent when he/she is no longer on an active call. Each call queue is assigned a lead number, which is a telephone number outside callers can dial to reach the agents assigned to the call queue. Call Centers are also assigned an internal extension, which can be dialed internally to reach the agents assigned to the call queue.
To complement the cloud based call queuing functionality, the Call Center service also provides additional visibility into the calling activity of each queue via a series of reports.
This article provides details on the following Enterprise Portal Call Center Configuration topics:
- Feature Setup
- Enable/Disable Call Center
- Incoming Call
- Incoming Call – More Options
- Holiday Service
- Night Service
- Entrance
- Wait
- Comfort
- Hold
- Overflow
- Bounced
- Stranded
- Unavailable
- Redirect
- Comfort Bypass
- Distinctive Ring
- Licenses
- Assigning Agents
- Assigning Supervisors
- Disposition Codes
- Unavailable Codes
Feature Prerequisites
Before the Call Center service can be used the following conditions must be met:
- At least one two-way DID must be assigned to the Call Center and be active.
- There must be at least one Call Center agent seat in inventory at the site.
- At least one agent must be assigned to the Call Center.
- At least the main greeting must be uploaded into the Call Center.
- Only Premium Station user may be assigned as agents or supervisors.
Call Center Notes
- User features such as Call Forwarding are not invoked on calls to users from the Call Queue.
- All greeting announcement files must be formatted as CCIT u-Law 8.000kHz, 8 bit Mono .WAV. The maximum file size is 2000KB which is approximately 4 minutes of audio recording length.
A. Getting Started
Prior to using Call Center, the site administrator must set up the feature. Follow the steps detailed below to configure or edit the feature.
A1. Feature Setup Steps
- Go to the Advanced Services tab in the left-hand navigation menu.
- Select Call Centers under Call Routing.
- Select the Actions drop-down menu next to the Call Center name and then select Edit Service to open the Edit Call Center window for set-up and editing.

Enable/Disable the Call Center
Click on the toggle in the Status column to enable or disable the Call Center.

Incoming Calls
Call Center Name – This is the name defined for the Call Center, which shows in the list of Call Centers. By default, the Call Center is given the lead phone number as the name. It may be changed to provide a more meaningful label. This is a required field. Supports from 1 to 30 characters.
Number – This is the lead number defined for the Call Center.
Extension – Shows the extension number of the Call Center. This can be used by users in the enterprise to call the Hunt Group. By default, it is the last four digits of the lead phone number. This is a required field. From 2 to 6 digits are supported.
Extension-Only Feature Note - If you have the extension-only feature enabled and have assigned the call center an extension only, you may not see a phone number assigned here. For more information about the extension-only feature, click here.
Caller ID – Enter a label. This will be shown to Call Center agents as part of the Caller ID on incoming calls to the queue. The caller ID will show the calling party caller ID name and number. This is a required field. From 1 to 30 characters are supported.

Incoming Calls: Advanced Settings
- Call Priority Settings - Calls in a Call Center are normally sent to agents in the order that they enter the queue and based on the priority assigned to the calls based on the Call Center or Alternate Number they dialed. Priority ranges from 0 (highest) to 3 (lowest).
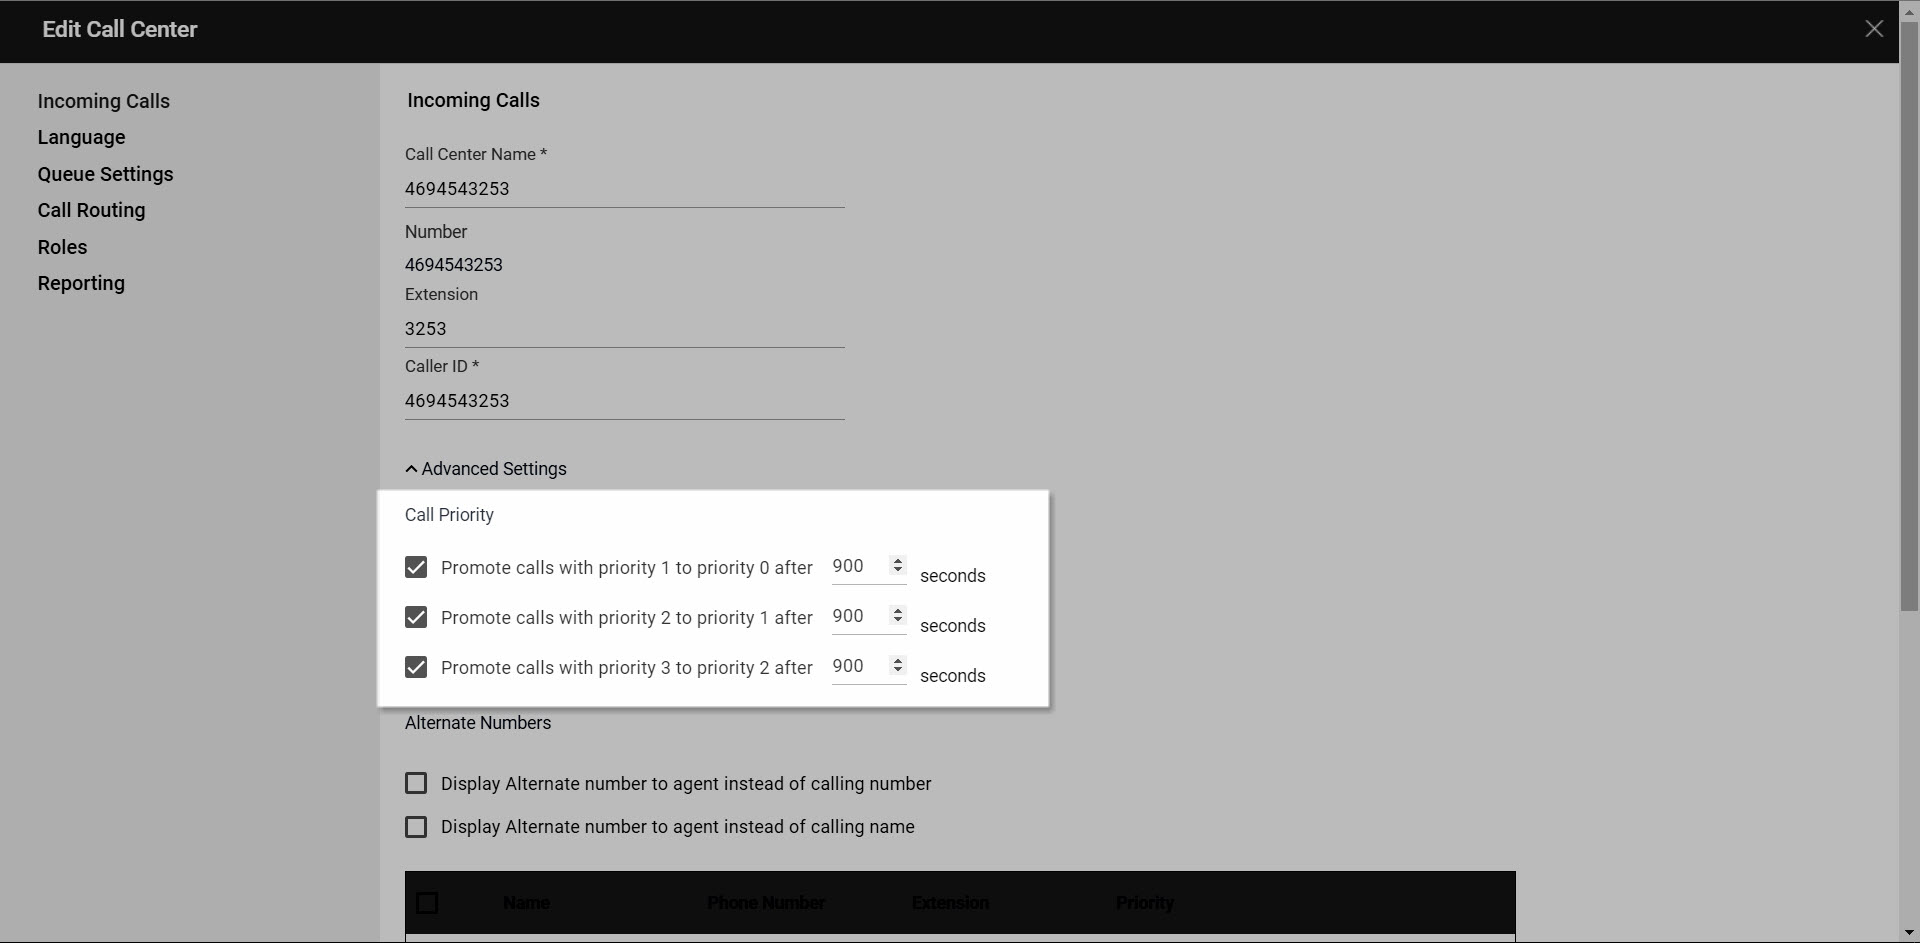
Calls can automatically be promoted to a higher priority if they are in a queue for a set amount of time. To automatically promote calls based on their time in the queue, check the appropriate box and enter a number of seconds.
- Alternate Numbers Display Settings - These settings configure the Caller ID, which is shown to agents on incoming calls. The default display shows the Caller ID Name configured for the Call Center and the calling party’s Caller ID name and number.
- Add Alternate Numbers - Alternate Numbers can be configured for a Call Center, which allows up to 64 different numbers to ring the same group of agents in a Call Center. Alternate Numbers list show the added Alternate Numbers by name, phone number, extension and priority. To add a new Alternate Number, hit the +Add button and fill in the required fields and the options desired.

This may be helpful to call centers that receive calls for multiple ad campaigns or support different companies that have different telephone numbers. The agent can identify what number was called and answer the phone appropriately.
Display DNIS number to agent instead of calling number – Checking this box will display the Caller ID number which is configured under Alternate Numbers in place of the calling party’s number. This will display the calling party’s name and the alternate number’s configured caller ID number.
Display DNIS name to agent instead of calling name – If a custom Caller ID name is configured under Alternate Numbers below, this name will display otherwise it will be the main Caller ID name for this Call Center. The number displayed will be the caller’s caller ID number.

Name – Enter a name for this Alternate Number queue, which is shown it the Alternate Number list.
Phone Number – Select a telephone number from those available on the Site to ring to the Call Center.
Extension – Enter an extension number for this Alternate Number.
Caller ID – Select a Caller ID number, which will be displayed to agents if the Display Setting is configured to display the DNIS number.
Priority – Select a priority from 0 (highest) to 3 (lowest) for this alternate number queue.
Use custom caller ID settings – Check to box to enable and display to agents the configured first name and last name for calls to this Alternate Number. This caller ID will be used if the Display Setting is configured to display the DNIS name.
Allow outgoing call center calls – Checking this box enable agents to make outbound calls using the Call Center Caller ID number in place of their own caller id number.
Use custom announcement – Check the box to utilize announcements, which are customized for this Alternate Number queue. Unique announcements for the Entrance, Wait, Comfort, Hold and Whisper may be used. From the Alternate Numbers list, selct the Edit button and select Announcements from the pop-up window.
See section below for the instructions to upload announcements.
B. Queue Settings
The queue size represents the number of calls that can be held in queue before the overflow policy is triggered. While calls are held in queue, users hear the configured announcements.
- Enter the number of calls to queue before overflow settings are triggered. For example, if the queue size is set to 20, the 21st caller will be sent to the configured overflow settings option.
- Check Play ringing tone to callers when their call is sent to an available agent. If disabled, callers hear the Music on Hold greeting until the call is answered by a user.
- You can also choose to reset caller statistics once the caller has entered the queue by checking the Reset caller statistics upon queue entry.
- Next, configure the overflow settings. This is what will happen to new calls that exceed the queue size. Options include:
- Perform busy treatment - The caller hears a fast-busy tone.
- Play ringing until caller hangs up - The caller hears ringing until they disconnect.
- Transfer to phone number - If this option is selected, enter the number to which you want to transfer overflow calls. This can be an extension within any site or an external number.
- To mark the calls as overflow after the queue wait time, check the box next to Mark calls as overflow after queue wait time.
- Check Play announcement before overflow processing (optional) to assign an announcement file to play before the call is sent to the overflow treatment. Then choose the announcement type:
- Default - This is the default system comfort announcement: "Your call is very important to us, but due to the high volume of calls, we cannot answer your call. Please hold while we transfer you to the voice messaging, so that we can help you as soon as possible."
- Custom - If a custom announcement is selected, at lease one recording file must be uploaded. Enter the required name of the announcement and upload the custom announcement.
- Select Save to save your changes.


Holiday Service
Holiday Service allows an optional message to be played and a different routing treatment for special days and Holidays where workers may not be present.
You can configure the Holiday Service under Advanced Settings in the Queue Settings tab:
- Enable Holiday Service by selecting the toggle next to Holiday Service.
- Select one of the actions to perform. Options include:
- Perform busy treatment - The incoming call is provided with busy treatment.
- Transfer to phone number - The incoming call is transferred to the configured destination phone number. If this is selected, you must enter the phone number you would like to transfer to in the Phone Number field.
- Next, select a Holiday Schedule from the drop-down box to apply to this Call Center. Please Note: Holiday schedules must be created in Services/Scheduling section of the portal for the schedule to be available here.
- Select the Play announcement before holiday service action if you would like the announcement to be played before the action is processed. Then, select either the Default system message or Custom announcement. If custom is chosen, upload a recording file.
- Default – The default announcement is “Your call is very important to us, but you have reached us on a scheduled holiday. Please call back during normal business hours or wait to leave a message.”
- Custom – Select the custom message option and upload a .wav file. Up to four holiday messages can be stored. If multiple messages are stored, they are played in the order listed. If this option is selected:
- Click in the first blank field.
- Enter the description of the message, e.g., Holiday Message. There are not any character limitations.
- Click the Upload button.
- Browse for the file on your computer. All greetings must be formatted as CCIT U-Law, 8.000kHz, 8-bit Mono attributes as a .wav file.
- Click Open. If necessary, repeat these steps to add additional messages.
- Select Save to save your changes.

Night Service
The Night Service option configures the announcement and treatment for calls received after normal business hours.

- To enable Night Service, select the toggle next to Night Service. Then choose the actions to perform. Options include:
- Perform busy treatment - The incoming call is provided with Busy treatment
- Transfer to phone number - The incoming call is transferred to the configured destination phone number. If this is selected, you must enter the phone number you would like to transfer to in the Phone Number field.
- Next, select the time schedule for the Night Service from the drop-down menu to apply to this Call Center. Please Note: To be available in this drop down, Night Service schedules must be created in Services/Scheduling.
- The following options may also be selected for this service:
- Force night service now regardless of business hours schedule - This policy allows the supervisor or administrator to override the time schedule and manually initiate Night Service for the queue. This manual override can also be activated by a Call Center supervisor using phone interface if the feature access code option is enabled below.
- Allow feature access codes to manually override night service – Enables the Call Center Supervisor to use their phone to activate (*53) and deactivate Night Service (*54) through the use of a FAC.
- Play announcement before night service action - For the busy and transfer actions, the policy can be configured to play an announcement prior to proceeding with the action. In this case, the announcement is played once to completion before the action is processed.
- Finally, select the Message Type to one of the following options:
- Default – The default announcement is “Your call is very important to us, but you have reached us outside of business hours. Please call back during normal business hours or wait to leave a message.”
- Custom –Upload a custom announcement file. Up to four night service messages can be stored. If multiple messages are stored, they are played in the order listed. If this option is selected:
- Click in the first blank field.
- Enter the description of the message, e.g., Holiday Message. There are not any character limitations.
- Click the Upload button.
- Browse for the file on your computer. All greetings must be formatted as CCIT U-Law, 8.000kHz, 8-bit Mono attributes as a .wav file.
- Click Open. If necessary, repeat these steps to add additional messages.
- Click Save to save your changes.
Welcome Message
The Welcome Message is the announcement settings for the initial message a caller hears when calling into the Call Center.

- To enable, select the toggle next to Welcome Message if you would like a message played when callers first reach the queue. For example, “Thank you for calling ABC Company. An agent will be with you shortly.” It will not be played if agents are available (callers will be sent directly to the agent), unless it is configured to be mandatory with the option below.
Please Note: The message may be the system default or a custom message which is chosen below. If not enabled, callers will not hear an entrance message when they arrive into the queue. Callers will be sent directly to an available agent or will be placed in the queue if no agent is available. - Check the Welcome message is mandatory if you would like enabled and the Play entrance message is also enabled, the message is played to all callers before they are either sent to an agent or placed into the queue if no agents are available. However, it will not play if the Queue Size is set to 0.
- Next, assign a message type to the service. Welcome messages can be configured with the default system message or customized.
- Select Default to select the default message option.
- Select Custom to select the custom message option and upload a .wav file. Up to four entrance messages can be stored. If multiple messages are stored, they are played in the order listed.
- Click in the first blank column.
- Enter the description of the message, e.g., Entrance Message. There are not any character limitations.
- Click the Upload button.
- Browse for the file on your computer. All greetings must be formatted as CCIT U-Law, 8.000kHz, 8-bit Mono attributes as a .wav file.
- Click Open. If necessary, repeat these steps to add additional messages.
- Select Save to save your changes.
OR
Estimated Wait Message for Queued Calls
The Wait announcement provides a message to callers giving them an indication of how long they will have to wait in the queue before their call is answered. Two wait options are available: Estimated Wait Time or Position in Queue.

- To enable, select the toggle next to Estimated Wait Message for Queued Calls.
- Enter the Default Handling Time in minutes. Select a number of minutes from 1 to 100. This is the announced wait time to callers when the system has not had enough calls to calculate the average wait time when the “Wait” option is chosen.
- Next, select Announce Queue Position and/or Announce Wait Time, if you would like the system to provide either the Wait or Queue Position announcement to callers.
- Queue Position – This option sets the Wait announcement to give the caller their position in the queue so that callers will know how many people are waiting and will be sent to an agent before them.
- Highest queue position to play message to – This configures the queue position announcement to play only to callers up to this entered queue position. Caller with a higher queue position number will hear the High Volume message if enabled. Choose a number between 1 and 100.
- Wait – This option sets the Wait announcement to give the caller the number of minutes estimated they will wait in queue before their call is answered.
- Highest queue position to play message to – This configures the queue position announcement to play only to callers up to this entered number of minutes. Caller with an average wait time longer than the entered minutes will hear the High Volume message if enabled.
- Check the Play high volume message, if you would like the default system message played to callers that are beyond the maximum position or minutes defined in the next section.
- Select Save to save your changes.
Comfort Message
An announcement that is played after the entrance message and before the music on hold. This is typically a custom announcement that plays information such as current promotions or information about products and services. Enter the time between comfort messages and select either default or custom announcement.

- To enable, select the toggle next to Comfort Message.
- Next, select the Time between comfort messages and enter a time in seconds that defines the play interval of the Comfort message.
- Next, choose one of the announcement types.
- Click Default to play the default system comfort announcement: “Your call is very important to us. Please wait for the next available agent...”
- Click Custom to play the custom message option. Up to four comfort messages can be stored. If multiple messages are stored, they are played in the order listed.
- Click in the first blank column.
- Enter the description of the message, e.g., Entrance Message. There are not any character limitations.
- Click the Upload button.
- Browse for the file on your computer. All greetings must be formatted as CCIT U-Law, 8.000kHz, 8-bit Mono attributes as a .wav file.
- Click Open. If necessary, repeat these steps to add additional messages.
- Select Save to save your changes.
Hold Music
This configures music on hold for the callers waiting in the Call Center queue. The music after the Welcome message, if it enabled, and between Comfort messages, if it is enabled. If no Welcome or Comfort announcements are enabled, music will play until the caller is sent to an agent, sent to overflow treatment or hangs up.

- To enable, select the toggle next to Hold Music.
- Next, select the announcement type.
- Click Default to play the default system comfort announcement
- Click Custom to play a custom hold music/message option. Up to four hold messages can be stored. If multiple messages are stored, they are played in the order listed.
- Click in the first blank column.
- Enter the description of the message, e.g., Hold. There are not any character limitations.
- Click the Upload button.
- Browse for the file on your computer. All greetings must be formatted as CCIT U-Law, 8.000kHz, 8-bit Mono attributes as a .wav file.
- Click Open. If necessary, repeat these steps to add additional messages.
- Select Save to save your changes.
C. Call Routing
On the Call Routing tab on the Edit Call Center page, the “How do you want your phones to ring?” setting determines the order in which calls are delivered to users assigned to the Call Center.

- Select how you want calls distributed in the Call Center.
- All at once - When an incoming call is received, all agents ring simultaneously.
- One at a time - Rings all agents one at time. If you select this option, select how you want the calls distributed. Choose from the following options:
- Top Down - Ring the agents one-at-a-time, always starting with the same agent and ringing in the same order. The agent configured at the top of the “Assigned” list will ring first, followed by the agents listed beneath, in sequential order.
- Circular - Ring the agents one-at-a-time, always ringing the agents in the same order. The order of the agents in the “Assigned” list represents the order in which the agents’ phones will ring, beginning with the individual that follows the last agent receiving a call from the Call Center.
- Longest Idle - Ring the agent who has been idle (i.e., not on a queued call) the longest.
- Weighted - Route calls to agents based on their pre-configured weight (percentage) assignments. If this option is selected, you must assign weights to the agents. Use the slider to assign the percentages. The percentages must equal 100%. Agents assigned a 0% weight will only receive calls if all other users are busy. Click Apply to save these changes.
- Select Save to save your changes
OR
Bounced
Bounced calls are those that have been sent to an available agent, but the agent does not answer.

- Check Mark calls as bounced after set number of rings to configure the number of rings a caller hears before the call is bounced. Then enter the number of rings.
- Check Bounce if agent becomes unavailable to bounce a call being sent to an agent if they transition to an unavailable state while the call is en route.
- Check Alert if call on hold for set wait time to notify an agent if a call they received from the queue was put on hold for longer than the configured time. Enter the time in seconds.
- Check Bounce if on hold for set wait time to bounce the call from the agent if the caller was placed on hold by the agent for longer than the configured time. Enter the time in seconds.
- Select Save to save your changes.
Overflow
Overflow treatment is applied to calls when the Call Center reaches its size limit or when callers have been in the Call Center for a specified amount of time. For example, if the Call Center queue size limit is set to 20, the twenty-first caller will be routed to the overflow destination. Likewise, if the overflow timer is set to two minutes, after two minutes, callers will be routed to the overflow destination.
- To configure Overflow treatment, under More Options in the Call Routing tab, select Overflow:
- Perform busy treatment - The caller hears a fast-busy tone.
- Play ringing until caller hangs up - The caller hears ringing until they disconnect.
- Transfer to phone number – If this option is selected, enter the number to which you want to transfer overflow calls. This can be an extension within any site or an external number.
- Check Enable overflow after call wait (x number) of seconds (optional) to apply overflow treatment to queued calls after a certain amount of time. If enabled, enter the amount of time in seconds. If the maximum number of queued calls is met, the next call to be presented to the queue is treated with the overflow settings.
- Check Play announcement before overflow processing (optional). If selected, assign an announcement file to play before the call is sent to the overflow treatment.
- Default – This is the default system comfort announcement: “Your call is very important to us but due to the high volume of calls, we cannot answer your call. Please hold while we transfer you to Voice Messaging so that we can help you as soon as possible.”
- Custom – If a custom announcement is selected, at least one recording file must be uploaded. Enter a required name for the announcement and hit the cloud button to browse the computer for a file. When the file is found on the computer, hit Open in the browser, to save the file on the system. Up to four files may be uploaded which will be played in order from top to bottom.
- Select Save to save your changes.

Stranded Calls
This policy allows for the configuration of the processing of stranded calls. A stranded call is a call that is being processed by a queue that has no agents currently staffed. (An agent is said to be staffing a queue if the agent has joined the queue and is not in the Sign-out state.) If the last agent staffing a queue “unjoins” the queue or signs out, then all calls in the queue become stranded and handled as described.
If an incoming call is received by a queue with no agents staffing the call center, then the call is initially put in the queue. Once the queued call is ready to be offered to an agent, if there are no agents staffing the queue, then the call is processed as a stranded call. In particular, if the mandatory Entrance Message option is enabled, then the entrance message is played to completion before the call is handled as a stranded call.
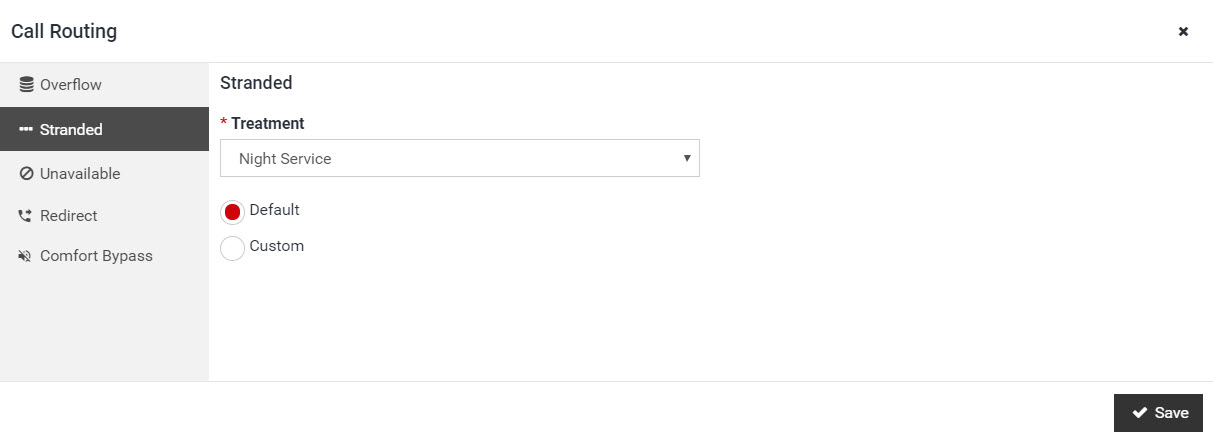
- To configure, select Stranded under More Options in the Call Routing tab.
- Next, select the treatment you would like to use for Stranded Calls. Options include:
- Leave in queue: Calls remain in the queue.
- Perform busy treatment: Calls are removed from the queue and are provided with the Busy treatment.
- Night Service: Calls are handled according to the Night Service configuration. If the Night Service action is set to “none”, then this is equivalent to this policy being set to “none” (that is, calls remain in the queue).
- Play ringing until caller hangs up: Calls are removed from the queue and are provided with ringing until the caller releases the call.
- Play announcement until caller hangs up: Calls are removed from the queue and are provided with an announcement that is played in a loop until the caller releases the call. If this option is selected, choose from one of the following:
- Default – This is the default system comfort announcement: “Your call is very important to us, but no agents are available.”
- Custom – If a custom announcement is selected, at least one recording file must be uploaded. Enter a required name for the announcement and hit the cloud button to browse the computer for a file. When the file is found on the computer, hit Open in the browser, to save the file on the system. Up to four files may be uploaded which will be played in order from top to bottom.
- Transfer to phone number: Calls are removed from the queue and are transferred to the configured destination. If selected, enter the phone number in the phone number field.
- Select Save to save your changes.
Unavailable Calls
This policy allows for the configuration of the processing of calls that are in a staffed queue when all agents are unavailable. A “staffed” queue has one or more agents who are both joined to and signed in to the queue.

Two conditions trigger the configured policy action: 1) An incoming call is received by a queue where all staffed agents are unavailable. If the mandatory entrance message option is enabled, it is played to completion before the policy action is applied to the call. 2) One or more calls are waiting in a call center queue when it is determined that all staffed agents are unavailable. The policy action is applied to all calls in the queue.
- To enable, select Unavailable under More Options in the Call Routing tab. Then select the Treatment from the drop-down menu. Options include:
- Leave in queue - Calls remain in the queue.
- Perform busy treatment - Calls are removed from the queue and are provided with Busy treatment.
- Night Service - Calls are handled according to the Night Service configuration. If the Night Service action is set to “none”, then this is equivalent to this policy being set to “none” (that is, calls remain in the queue).
- Play ringing until callers hang up - Calls are removed from the queue and are provided with ringing until the caller releases the call.
- Play announcement until caller hangs up - Calls are removed from the queue and are provided with an announcement that is played in a loop until the caller releases the call. If this option is selected, choose from one of the following:
- Default – This is the default system comfort announcement: “Your call is very important to us, but no agents are available.”
- Custom – If a custom announcement is selected, at least one recording file must be uploaded. Enter a required name for the announcement and hit the cloud button to browse the computer for a file. When the file is found on the computer, hit Open in the browser, to save the file on the system. Up to four files may be uploaded which will be played in order from top to bottom.
- Transfer to phone number - Calls are removed from the queue and are transferred to the configured destination. If selected, enter the phone number in the phone number field.
- Select Save to save your changes.
Redirect
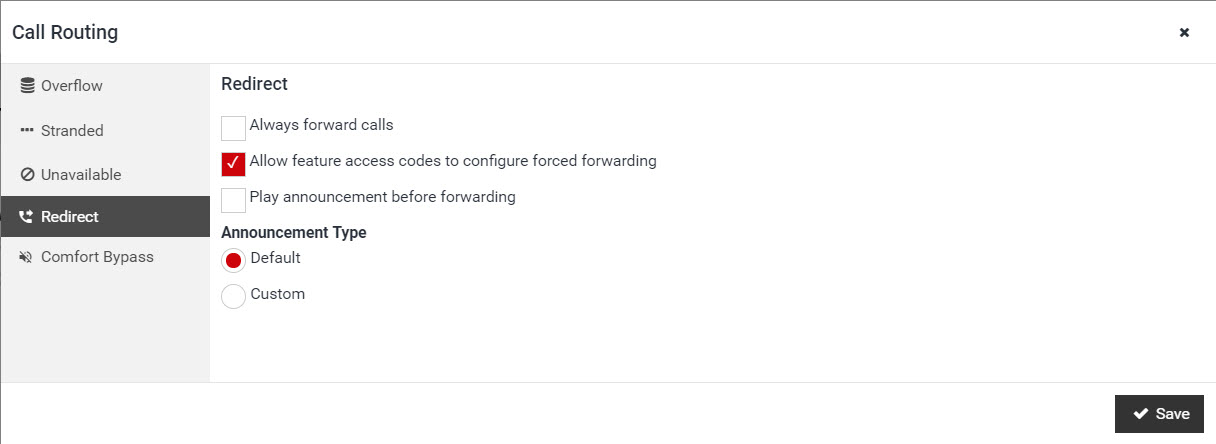
- Check the Always forward calls box if you would like incoming calls forwarded to the configured destination. Calls that are already in the queue remain queued.
- Check the Allow feature access codes to configure forced forwarding box if you would the Call Center Supervisor to use their phone to activate (*51) and deactivate Redirect (*52) through the use of a FAC.
- Check the Play announcement before forwarding box to enable and select either default or custom announcement. If this option is selected, choose from one of the following:
-
- Default – This is the default system comfort announcement: “Your call is very important to us but due to an emergency, our agents are not available. Please hold on while we transfer you to a location that may assist you.”
- Custom – If a custom announcement is selected, at least one recording file must be uploaded. Enter a required name for the announcement and hit the cloud button to browse the computer for a file. When the file is found on the computer, hit Open in the browser, to save the file on the system. Up to four files may be uploaded which will be played in order from top to bottom.
- Select Save to save your changes.
Comfort Bypass

- Check the Bypass comfort message box if you would like an alternate comfort message to be enabled for calls that are expected to be answered quickly instead of the usual comfort/Music-On-Hold treatments. This policy applies after the entrance message has finished playing (if applicable).
- The time threshold that triggers the comfort message bypass is configurable from 1 to 120 seconds. When a new incoming call is received by the queue, if the longest waiting time for a call in the queue is less than or equal to this threshold, then the alternate Comfort Message service is triggered.
- Check the Play announcement after set wait time box if you would like to configure the amount of time a caller will hear ringing until the Comfort Bypass message is played. From 1 to 120 seconds is supported. If this option is selected, choose from one of the following:
- Default - This is the default system comfort announcement: “Please hold while we transfer you to an agent.”
- Custom - If a custom announcement is selected, at least one recording file must be uploaded. Enter a required name for the announcement and hit the cloud button to browse the computer for a file. When the file is found on the computer, hit Open in the browser, to save the file on the system. Up to four files may be uploaded which will be played in order from top to bottom.
- Select Save to save your changes.
Distinctive Ring
Distinctive ringing provides an alternative ringtone to an agent for Call Center calls. This allows an agent to easily recognize a call as either a direct call or a queue call through an audible tone.

- To enable, select the Enable Distinctive Ringing checkbox.
- Next, select a distinctive ring pattern from the drop down box.
- Select Save to save your changes.
D. Roles (Agents)
These settings apply to the agents that have been assigned to the call queue.
- Check the Automatically answer calls after box if you would like calls to be automatically answered by an agent. If selected, choose the value in seconds.
- Check the Allow multiple calls per agent box if you would like agents to be presented with multiple queue calls even when they already on a call if they have their Call Waiting feature enabled.
- Check the Allow calls to agents during 'Wrap-Up' box if you would like to have agents receive calls from the queue even when they are in Wrap-up state when this option is enabled. If not enabled, Agents will not receive calls from the Queue when they are in a Wrap-Up state.
- Check the Enable maximum 'Wrap-Up' timer of box to enable and to limit the value an Agent may enter as their Wrap-Up time in their Agent portal.
- Check the Automatically set agent's state after call box if you would like the system to automatically put Agents into the defined state when they hang up a queue call. Select the state in the drop-down box. If not chosen, the Agent will be put in an Available state by default. However, the Agent is able to configure their post call state in their Agent portal which will be used if this setting is not enabled.
- Select Save to save your changes.

Licenses
To be assigned to a Call Center, a user must first be assigned a license.
- Apply a Call Center Agent or Supervisor license to desired users by checking the box in the Agent or Supervisor column next to a name. Once assigned a license, the user may be assigned to any or all Call Centers within the Enterprise.
- Select Save to save your settings.

Assigning Agents
Agents is where a user with an Agent license is assigned to a Call Center.

- Use the Find and Assign search box to select users for assignment to the queue. Then the window below will show the list of users that are assigned to the Call Center and will receive calls from the queue.
- To unassign a user, select the X next to the user's name.
- Select Save to save your settings.
Supervisors
Finally, the Supervisors section is where a user with a Supervisor license is assigned to a Call Center.

- Use the Find and Assign search box to select the user for assignment to the queue as a Supervisor. Then the window will display the users with a Supervisor license.
- To unassign a user, select the X next to the user's name.
- Select Edit under the Agents Monitored column to allow the Supervisor to monitor the assigned Agents in the Supervisor web client. In the pop-up box, select the Agents for this Supervisor to monitor in their portal.
- Select Save to save your settings.
E. Reporting
To view reports on the queue and agent stats, follow these steps:
- Select the Reporting tab on the Edit Call Center page.
- Then click on the date field and enter the date you wish to pull a report from and select Run Report. The report will show queue stats displayed with agent stats in the next tab. Click the Refresh icon to update the report at any time.

The following are descriptions of the results displayed in each report:
Queue Stats Report
Calls Abandoned (avg. in sec) – Avg. Time callers spent waiting until they abandoned their call
Number of Agents Staffed(avg.) - Average number of assigned agents to queue for the period requested
Number of Agents Talking(avg.) – Average number of agents in an active conversation for the period of time requested
Wait Time(avg. in sec.) – Average amount of time in seconds a caller is held in queue prior to agent answering
Busy Overflows – Number of calls that came in after queue limit was met
Calls Abandoned – Total # of calls that were terminated by the caller prior to speaking to an agent
Calls Answered – Total number of calls answered by agents
Calls Timed Out – Total number of call that remained unanswered and were forwarded out of the queue upon timeout
Calls Transferred – Total number of calls transferred out of the queue
Agent Stats Report
Average Calls(min) – Average time in minutes agent spends on calls from the queue
Calls Handled – Total number of calls handled by the agent
Total(min.) – Total amount of time the agent was busy handling calls out of this queue
Total Calls – The total number of calls the agent has handled
Unanswered Calls – Total number of calls extended to the agent (phone rings) that were not answered
Hold Time(min.) – Total amount of time in minutes an agent locally held active calls on hold
Talk Time(min.) – Total amount of time in minutes an agent was actively talking on a call
Disposition Codes
Disposition codes provide agents with the possibility to enter disposition codes for a call center call. The purpose of these codes is to associate a given call center call with a marketing promotion or other elements. The disposition codes contain two elements: an identification value and a description.
Disposition codes can be used to address multiple scenarios, for example, capturing the result of the call (“Requires Follow-Up”, “Issue Resolved”, “Contacted Sales Rep”), capturing customer comments (“Angry”, “Happy”, “Called Multiple Times”), or capturing marketing campaign feedback (“Print Advertisement”, “Web Site”, “Direct Mailing”).
Disposition codes may be entered by the call center agent while the call center call is in progress or once the call has been finished and the call center agent is in Wrap-up state.

- Check the Enable call disposition codes box to enable the use of Disposition Codes.
- Check the Include default codes box to allow the use of the system defined codes. If not enabled, only custom codes will be available for selection. Review the default code list to enable the desired codes.
- Check the Force use of call disposition codes box to require an agent to enter a disposition code. Choose a default code which will be entered if the agent does not select a code.
- The Default Disposition Codes section is where the system defined codes available for use. Each code may be activated or deactivated depending on the applicability of each code to the application.

Default codes are listed below:
|
Code # |
Description |
|
1000 |
Abandoned On Answer |
|
1001 |
Appointment Scheduled |
|
1002 |
Billing Question |
|
1003 |
Callback AM |
|
1004 |
Callback PM |
|
1005 |
Callback Weekend |
|
1006 |
Caller Hung Up |
|
1007 |
Cancellation |
|
1008 |
Change Request |
|
1009 |
Complaint |
|
1010 |
Complete |
|
1011 |
Follow Up Required |
|
1012 |
Incorrect Number |
|
1013 |
Issue Resolved |
|
1014 |
New Order |
|
1015 |
Product Question |
|
1016 |
Refund Request |
|
1017 |
Reservation Complete |
|
1018 |
Response to Advertising |
|
1019 |
Sale Closed |
|
1020 |
Sale Pending |
|
1021 |
Software Error |
|
1022 |
Supervisor Attention Required |
|
1023 |
Technical Support Question |
|
1024 |
Trouble Ticket Opened |
Codes 1025-1049 are reserved. Codes 1050-1099 may be customized.
In the Custom Codes section, custom codes can be created by the customer and can be tailored to their business needs.

A list of codes which have been previously defined are displayed. The Code, Description and Active flag shown in the columns.
- Click “Add” button to add a new code. Select a code from the drop-down box and enter a description then hit Save.
- To delete a code, select the box next to the code to be removed and hit Delete.
Unavailable Codes
Agent Unavailable Codes are configurable attributes that are applied when an agent becomes changes their status to Unavailable in their web client. Agents may select a reason for changing their agent (ACD) states to Unavailable (for example, on lunch, in the bathroom, taking a coffee break or a personal break).
Call center managers can use this data to better understand the performance of their agents.
A default list of system codes may be used or custom codes may be created to specifically fit the business need.

Default Codes:
|
Code # |
Description |
|
2000 |
Additional Disposition Time |
|
2001 |
At Lunch |
|
2002 |
Beginning of Shift |
|
2003 |
Coaching |
|
2004 |
Do Not Disturb |
|
2005 |
End of Shift |
|
2006 |
In Training |
|
2007 |
Mentoring: Agent to Agent |
|
2008 |
Mentoring: Supervisor to Agent |
|
2009 |
On Coffee Break |
|
2010 |
On Conference Call |
|
2011 |
On Internal Call |
|
2012 |
On Personal Break |
|
2013 |
On Personal Call |
|
2014 |
Other Work |
|
2015 |
Technical Difficulties |
- Check the Enable agent unavailable codes box to enable the use of Unavailable Codes. When enabled, a drop-down box will appear in the Agent and Supervisor web clients next to their name near the top right portion of the screen.
- Check the Force use of unavailable codes box to enable the system to make it mandatory that an agent select a code when the changes their status to Unavailable. If not enabled, the use of Unavailable codes is optional.
- The Default codes section displays a list of system defined codes. All codes are selected by default. Review the list to determine which codes fit the particular business need. When the box in the Active column is selected, the code is active. If not selected the code will not be visible to agents to select in their web client.
- Select the Add Code button to add a new code. Select a code from the drop-down box and enter a description then hit Save.
- To delete a code, check the box next to the code and click Delete.

The Custom codes listed in this area are created by the customer and can be tailored to their business needs. A list of codes which have been previously defined are displayed. The Code, Description and Active flag shown in the columns.
