

Introduction
The CRM Connect client integrates your BroadSoft service with a variety of business applications to provide a more effective and intuitive work environment for your team. You can use CRM Connect to easily manage key telephony features like do not disturb, call forwarding, and mobility settings.
Note: CRM Connect is a click-to-dial client not a softphone client meaning it can’t make or receive calls on its own. You need to have a device (either phone or UC-One Communicator soft client) assigned. Once a device is assigned, when you make a call from CRM Connect it will first ring the phone and/or UC-One which must be answered before the call to the destination number is made. Likewise, when an incoming call comes in and you hit “answer” on the CRM Connect client, it will be answered by the phone not the client.
Help Topics
If you are installing for the first time, these instructions should be followed in order of this guide for best results.
A. CRM Integrations – Installation and Dialing Guides
CRM Connect works with the following applications. Click on any application to download the installation guide and, if applicable, the dialing guide.
B. Installation
To install CRM Connect:
- Log in to the My Phone Next portal and go to the My Apps tab.
- Click Download next to CRM Client. A file will download to your computer. Depending on your computer configuration, you may be asked if you want to save the file.

- Double-click the CRMConnect.exe file and follow the prompts to install.

- Review the end-user license agreement and click the I Agree button to continue. You must agree to the end-user license agreement to complete the installation.
- Follow any onscreen instructions. Once CRM Connect has finished installing, click Finish to close the installer.

C. Login Details and Initial Configuration
CRM Connect sits silently in your tray menu, waiting for you to click on it or waiting for calls to be made or received. CRM Connect is designed to be discrete. Always running and providing useful information as you need it, yet at the same time not annoying and interferring when you’re trying to work. Note: In Windows, some tray icons become hidden and expressly have to be shown. These settings are stored in the ‘Notification Area Icons’ part of the Windows Control Panel.
- Once the installation has finished, you will need to enter your BSFT credentials.
- Right-click on the CRM Connect icon, which is the gray circle on the tray menu.

- Click on the Configuration option.

D. Telephony Configuration
- You must first configure the Telephony section. In this window you will find the following options to configure:
- Server: Select the appropriate market where you are located. This determines which server will be used to authenticate your credentials. This should be your correct server by default. Please as your administrator if you are not sure what server should be selected here.
- Username: This is the username found in My Phone under the CRM Connect tab. This should be the same Username and password as your other BSFT client’s. Note: If on R22 release, they will be the same credentials for your portal and all client’s (Uc-One, UC-Mobile, etc).
- Password: The Password should be the same password as your other BSFT client’s. Note: If on R22 release, they will be the same credentials for your portal and all client’s (Uc-One, UC-Mobile, etc).
- Enter your settings and click Save.
E. Integration Configuration
- Next, go to Add New under Integrations. You will need to select the CRM System you will be using along with your credentiasl for that system. Pleae see the CRM Integrations – Installation & Dialing Guides for your application specifications at the beginning of this guide.

- From the drop-down menu, select the CRM software intergration.
- Depending on your selection, you will need to enter information based on that platform.

- The Integration test area allows you to test the settings you have entered by entering a telephone number and seeing if the software can find it. If the number is found, you can click the Show contact button to make sure that "popping" works.

- Click the Save button to store any new/edited information or click the Cancel button to discard any new/edited information.
F. Dialing Settings
On this tab, you can turn dialing on and off from all the different types of applications that the software supports.
Dialing methods: Check the appropriate boxes to turn the required dialing methods on. The different methods of dialing are:
Clipboard dialing: Copy a telephone number to the clipboard so CRM Connect can dial it automatically.
Web Page Dialing: CRM Connect can automatically scans web pages in supported web browsers and convert anything that looks like a telephone number into a clickable hyperlink.
Application dialing: CRM Connect dynamically adds new Dial buttons to applications that you have trained it for.
TAPI Dialing: Provides a Windows TAPI Driver to allow third-party applications to dial through CRM Connect.
Focus dialing: Dynamically recognize any telephone numbers in the textbox where the cursor is located and allows to dial that number to be dialed.
G. Other Options
| Quick dial box | Type a number here and press Enter to make an immediate phone call. |
| Recent | Quickly see recently dialled numbers and click to redial them. |
| Features | Allows the configuration of specific BroadCloud features for the user including Call Fowarding Always and Do Not Disturb. |
| Phone | Opens a pop-up window that allows the entering of a number to dial or to pick-up via the Click to Dial function to your phone. |
| Presence | Opens a pop-up window that enables the search and selection of users to monitor their phone presence. |
| Address Book | Opens a pop-up window that enables the search and selection of users in your Site and your CRM contact directory to get phone details and make a call to. |
| Call History | Shows your BroadCloud call history from the basic call log. |
| Help | Opens a web browser to the on-line help pages. |
| Exit | Use this to unload the software as an active application. |
H. Running CRM Connect
CRM Connect should be run with local Administrator privileges. Please see the log within the Configuration panel for information on troubleshooting any issues.
The icon should be green (or red when on an active call) when you are successfully logged in. If this is not the case please check the Username and Password.
Sometimes changes can be made to settings in Windows, CRM Connect or other applications to make the visibility and usability of CRM Connect easier.
For example, it is advised that Windows 7 Users configure the settings in the Windows Control Panel / All Control Panel Items / Notification Area Icons for CRM Connect and set the behavior to Show icon and notifications. This is shown below:

Another example is if you have a BroadCloud UC-Desktop client, which also provides a preview window. This can cause a double pop up notification as shown below:
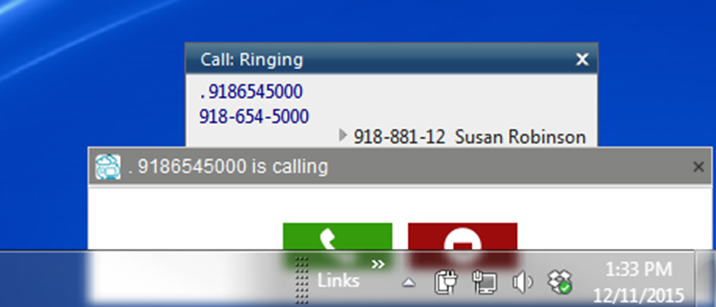
You can disable the notifications in either application to rectify this or move the CRM Connect notification to another location on the desktop.
To disable the CRM Connect notification, navigate to the Configuration panel, select Events/Call Events tab from the menu on the left and change the action in the dropdown for “On ringing”, “On answer”, or “On outbound” to No Action and then hit Save.
